DIY Jewelry Holder Tutorial
Supplies:
- Piece of wood (mine was 24 inches long by 1-1/2 wide)
- Scrapbook paper (pattern of your choice)
- Paint (one that matches your paper, I used black)
- Paintbrush (I used a small foam brush)
- Drawer knobs (got mine cheap at Ikea, see the one’s below they would be cute too!)
- Sandpaper (just a small scrap)
- Modge Podge (see below)
- Drill

First, decide how many knobs you want, measure and mark wood with pencil (mine were 2 inches apart starting 1 inch from the edge).

Drill holes (wide enough for your screws to fit through).

It should look like this…

Next paint the edges.

Once your paint is dry, trace your board on the back side of your scrapbook paper and cut (I used 2 pieces, they are face down in the picture below). Then spread some modge podge on the top of your board.

Place paper on top and press down firmly.

Let dry a little, then use your sandpaper in a downward motion along the edge of your paper to make it flush with the wood. Wipe off with a dry towel when done.

Use paintbrush to apply a light amount of paint around the edges you just sanded.

Now you need to poke a hole through your scrapbook paper where your drilled holes are. I put the screw through the bottom and poked a pointy pencil down through the paper. Do this with each hole.

Then push your screw up through the bottom, while holding the screw in place, attach the knob to the top, screwing on till tight.

That’s it!! You will need to add hanging hooks to the back to hang (I have not done that yet).

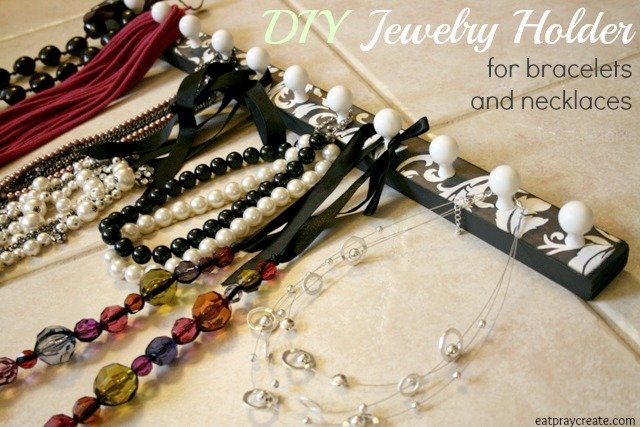
Once you hang it just add your jewelry!

Enjoy! And don’t forget to Pin It!!
Click HERE to see all the fun Linky Parties I link up to!
-Taya

Latest posts by Taya (see all)
- Invisible Person Costume Tutorial - September 16, 2025
- Birth Stats Stuffed Animal Tutorial - September 24, 2024
- Star Tip Character Cakes Made Easy - January 20, 2023
Taya
Hi I'm Taya! A stay-at-home mother to 5 cuties. I love to craft, sew, blog and make fun things. I'm the creator of the 'Eat-Pray-Create' blog and I'm so glad you're here!


You May Also Like

DIY Easy Car Seat Blanket Tutorial

3D Paper Christmas Tree Centerpieces
