
Felt Christmas Tree Advent Calendar Tutorial – Part 1


A Feathered Nest’s Advent Calendar:

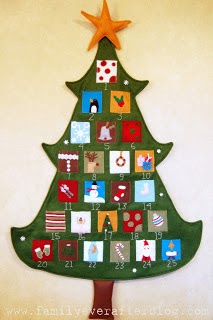
Family Ever After’s Advent Calendar:
So without further ado, lets get started….
Here is a list of the supplies you will need (some items are optional) you can make this calendar how ever you like, I have a friend following along who would like a no-sew version so I will try and suggest hints for that and some of you may want to get more detailed so I will point you in that direction too. Mine is gonna be somewhere in the middle!
ITEMS NEEDED:

*Not all items are shown in picture*
Green Felt (1-1/4 yards of 72”wide) This amount may very if you are doing bigger pockets than 3-1/2”
Felt Scraps/Sheets (sold by the sheets at most craft stores like JoAnns, get a variety of colors…red, white, blues, greens, brown, yellow, etc. buy different shades too)
Scissors (fabric and paper)
Fabric glue
Ruler, pencil or pen
Large paper (you can use wrapping paper here)
Optional Items:
Embroidery Thread/Floss (all different colors)
Fusible Interface (if you plan on doing embroidery on your pockets you will need to iron on this stuff to the backs when done)
Batting (If you want batting in between your felt tree pieces, to add a little dimension)
Hand Sewing Needles (that your embroidery floss will fit into)
Embellishments (Christmas)
DETAILS and PATTERN MAKING:
I haven’t gotten all my supplies yet but I had the materials to make my pattern and yesterday I sat down and drew out all the details of what I want my tree to look like. It is going to be a little different from the ones I have seen online. First of all I want a more rounded tree and I want circle pockets instead of squares. Let’s begin making our pattern…
So start by rolling out your pattern making paper (or wrapping paper), if yours is not wide enough to draw the whole tree just draw half of it and you can cut the felt on a fold. Here is a picture of my tree pattern. I drew one side and then folded it in half to make both sides identical. Cut it all out.


Now GO SHOPPING!! We will start cutting our pockets and our tree out once we get our supplies! I started cutting my circles out last night because I have tons of scrap pieces of felt lying around, but tomorrow I will be getting the rest of my supplies. Don’t forget your coupon for the craft store!!
NOTE: The Squares in the other tutorials are 4”x3-1/2”. I made my circles 3-1/2inches round. My tree pattern is based off of that size circle, you may need more Green Felt for your tree if you are making larger pockets. I would strongly advise you to make your pattern first and take it with you to the craft store to make sure the felt is big enough to cut 2 tree patterns from it, this is how I plan on cutting my felt tree out(see pic below). If your felt is not as wide (about 72”)you may also need more felt. Rach from “Family Ever After” uses 2 yards of Green Felt for her tree. So the measurement may very, just a heads up!

And here is a sneak peak of my circles that I started cutting out!! (that is a penny and a quarter in the pic so you get an idea of how big a 3-1/2 inch circle really is!)

Now on to Part 2 found HERE!! And here is PART 3!
Go HERE to see all the fun linky parties I’ve linked up to!

Latest posts by Taya (see all)
- Invisible Person Costume Tutorial - September 16, 2025
- Birth Stats Stuffed Animal Tutorial - September 24, 2024
- Star Tip Character Cakes Made Easy - January 20, 2023
Taya
Hi I'm Taya! A stay-at-home mother to 5 cuties. I love to craft, sew, blog and make fun things. I'm the creator of the 'Eat-Pray-Create' blog and I'm so glad you're here!


One Comment
Elisa
Hi Taya! Thank you for your great tutorial! I mentioned your pattern on my blog, because I used it for one of my projects. If you like to see my advent calendar, you can go http://filarteli.it/2017/11/20/calendario-dellavvento/. My blog is in italian, but fortunately images are international.
Thank you again!